

To make the tree, you will need:
- 1 piece of 6" patterned paper.
Instructions:
Step 1: Cut out a 6 inch circle of patterned paper.
Step 2: Fold the circle in half and then in half again.
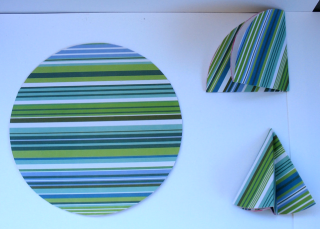
Step 3: Fold the quarter circle into thirds, radiating from the point.
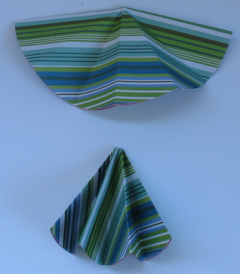
Step 4: Open up paper so it is a half circle again. Now, fan-fold along previously folded lines.
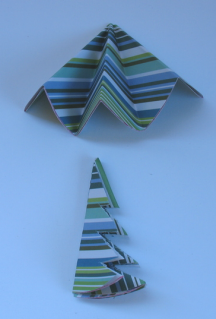
Step 5: The top picture shows the fold that you do NOT cut on. Flip it upside down. You want the 2 folds and 2 ends side. Using sharp scissors, cut 3 v's like the bottom picture.
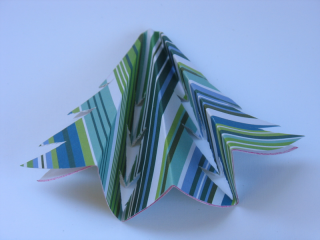
Step 6: Here's a picture of the back. Place some adhesive in the folds.
Step 7: Flip your tree over and adhere it to card front.
Optional idea: Make 2 trees and adhere together. Thread string through the top and use as an ornament or on top of a gift.
Thank you for visiting We Grow By Our Dreams today. I have lots more projects and tutorials on this and on my other blog, The Vintage Sheet Blog.

18 comments:
Ooohhhh I love this on the card. So adorable, and such a simple layout. Perfection.
Super duper!
OMG! Wonderful tutorial! THanks! Hugs! Ash
www.ashleyscreativecorner.blogspot.com
Very Cute! I love the colors you used!
This looks very cool!
OH oh!!! it's awesome!!! I have to make one! I'll try to find some time tonight!! This is just wow!
WOOOWWWW, your 3D Christmas tree is great! Great tutorial. And ofcourse the end product, your card, is STUNNING! Love the colors!
xxxMarieke
This is so pretty! Thanks for sharing!
This is so cool! I shared it with some scrappers/cardmakers on the 2 Croppin Cousinz site. Hope thats ok!
Hi! Heather:)
Very Cute!
Thank you for your great tutorial!
I can make it!!
xWhat a cool tree. Great tutorial.
This is very cute - and I love the colors.
super! I love this!
This is Fantastic!
Happy Holidays!
Sandra Evertson
This is soooooo cool! I will have to try this!
Great card and excellent tutorial - TFS.
Teresa
Can you please tell me what issue of Pack-O-Fun that was in?
Thanks for the 3d tree tutorial. Exactly what I needed!
Post a Comment